
You have found the code base which powers the Zesty.io instance manager. While this code base can be run locally it is only recommended to do so for developing. If you would like to learn more about Zesty.io visit our documentation at zesty.org
The manager-ui has been architected following the PRPL strategy described by Houssein Djirdeh at Google. Every sub application has it's own bundle build. Application bundles are then pre cached dynamically by the app shell based upon the users settings.
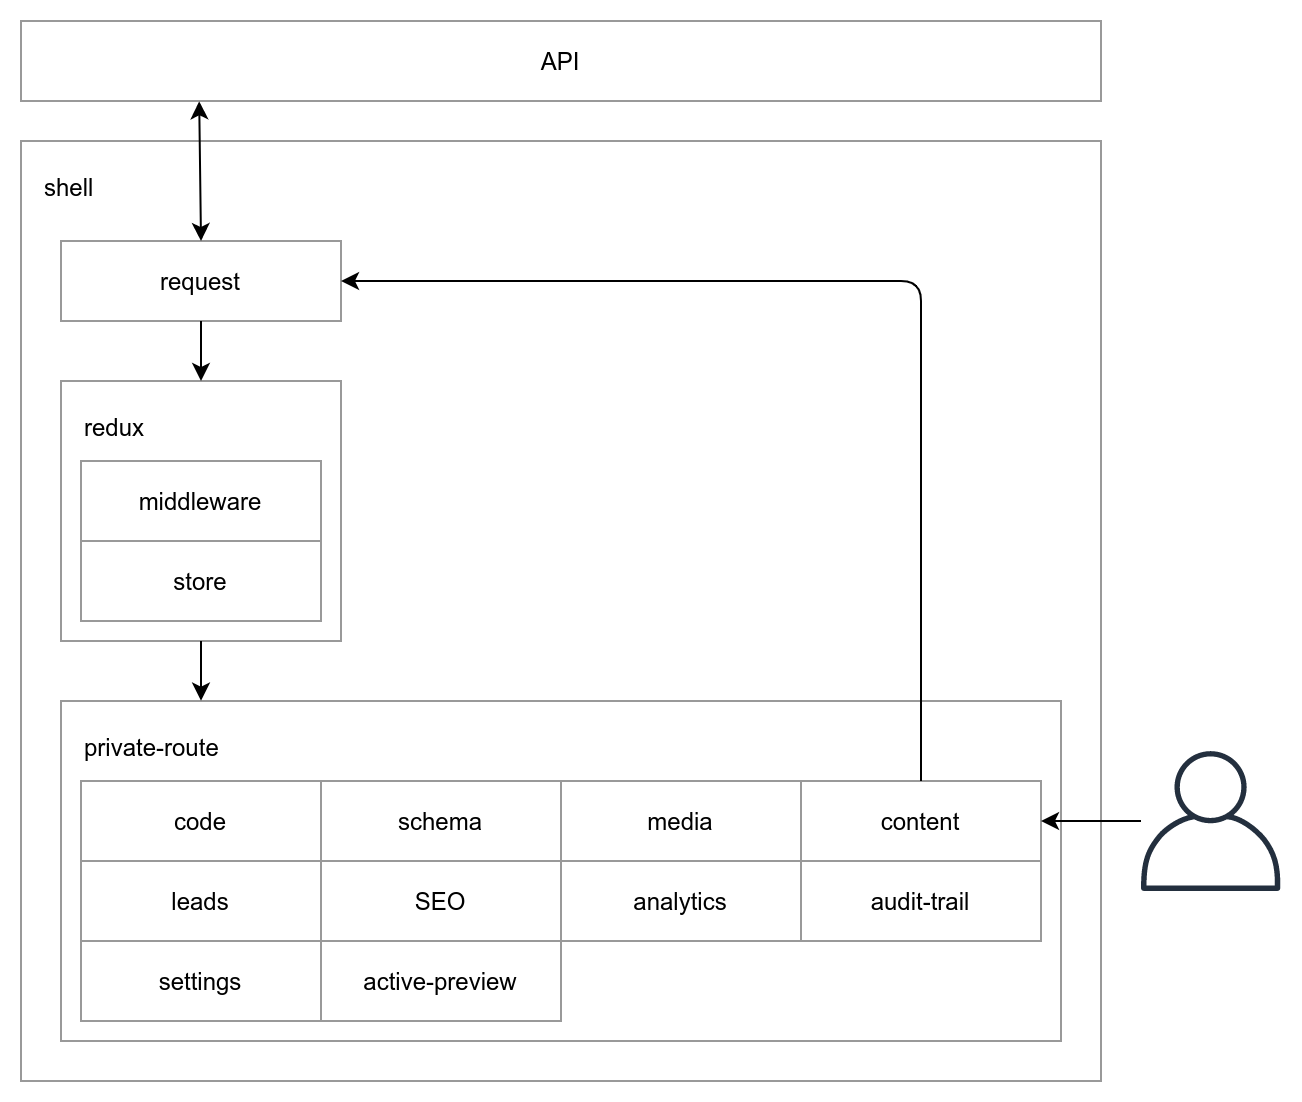
TL;DR: Install all dependencies at the project root
In order to avoid the confusion of sub-app bundles specificying different versions that are actually included with the vendor bundle all dependencies have been lifted to the repo root. By lifiting all dependencies to the top level package.json we have a single location to manage dependency versions.
This means all sub dependency declarations are resolved, per npm default behaviour, by traversing up the project until it finds tehe node_modules directory at the root.
Webpack is used as the bundler of choice. There is a single webpack config in the app shell which, using lazy routes, separates the sub-apps into individual bundles.
A redux store is used to manage state across all of the potential sub-apps. The shell setups a global store which is then shared to sub-apps that can dynamically inject reducers if needed.
- Node.js version 16 LTS
- Web browser: Chrome / Firefox / Edge / Safari (latest)
- Redux DevTools Extension - https://github.com/zalmoxisus/redux-devtools-extension
- Install Redux DevTools Extension
- Click on Redux DevTools icon in browser (or right click and open in new window)
- View sequence of Redux Actions and other features like state diffs and rewind.
Every instance has a Zesty Universal ID (ZUID) which uniquely identifies itself to the API. When running the instance manager on your host machine you will need to point the unique instance URL to your host machines localhost by editing your hosts file. This is necessary as network requests to remote resources will fail a Cross-Origin Resource Sharing (CORS) request otherwise. This will then route through your localhost hitting the Webpack dev server and then make network requests to remote services as the expected referrer.
NOTE: Running the instance manager locally still connects to remote PRODUCTION resources. Meaning any actions you take will be done against your live instance.
e.g. linux: /etc/hosts
windows: c:\windows\system32\drivers\etc\hosts
127.0.0.1 YOUR_UNIQUE_INSTANCE_ZUID.manager.zesty.io
- Install dependencies:
npm install - Start webpack:
npm run start - Load the app in your browser:
YOUR_UNIQUE_INSTANCE_ZUID.manager.zesty.io:8080
npm run start:stage
Functional UI tests are run with cypress.io
To run the tests on your machine you will need to create a cypress.env.json file at the root of the repository, add the following JSON and replace the email/password with valid credentials.
Terminal
npm run test:open
{
  "email": "EMAIL",
  "password": "PASSWORD"
}
Run Cypress
New terminal npm start
Open a second terminal npm run start:test
Pull Cypress Screenshots
npm run ci:pull:screenshots
CI runs 5 parallel jobs using cypress-split. Runners 0–3 split the general spec pool automatically using SPLIT=4. Runner 4 is dedicated to publish-related specs to prevent cross-runner interference — see .github/workflows/ci.yaml for details. To add more general runners, increment the matrix array and SPLIT together.
A timings.json file at the repo root enables runtime-based spec distribution so runners finish at roughly the same time. It is generated automatically during CI runs and needs to be committed manually.
To regenerate it:
- Open a PR and let CI run
- Download the
merged-timingsartifact from the Actions tab - Extract and commit
timings.jsonto the repo root
If timings.json does not exist, cypress-split falls back to distributing by spec count with no errors.
When to update timings.json: Refresh it whenever you notice runners finishing at significantly different times — typically after adding several new specs or after a large refactor of existing ones. A periodic refresh every 1–2 months is a reasonable cadence to keep distribution accurate.
Requires Claude Code. This isn't an npm script or CLI binary — it's a Workflow script that only runs inside a Claude Code session, where it drives multiple AI subagents to do the extraction/wiring/verification. There's no equivalent for localizing new copy without it.
Mind your token usage. Even a single small file fans out to several subagents (Discovery, one Extract & Wire agent per batch, Composer, Verifier) — a one-string component still used ~5 agents and ~350k tokens end to end in testing. Scope target to what you're actually adding (a component or a small folder) rather than a whole sub-app root unless you mean to re-run a full namespace pass, and prefer running it once per PR rather than repeatedly against overlapping targets.
You still have to translate manually. The workflow only ever writes English placeholder values into the 5 non-English locale files — it does not translate. This is by design, not a gap: having every subagent in the pipeline also translate into 5 languages would meaningfully increase the token cost covered above for a step a human/QA pass needs to review anyway. After running it, open the diffed public/locales/<locale>/<ns>.json files (everywhere but en-US) and replace the English placeholders with real translations (machine-assisted is fine, but flag for native/QA review per the Localization section of CLAUDE.md) before merging.
New user-facing strings should go through the localize workflow rather than being wired up to i18next by hand — it extracts hardcoded strings, replaces them with t()/<Trans> calls, writes/updates the locale JSON across all 6 languages, and verifies the result. The script lives at .claude/workflows/localize.js.
To run it: open this repo in Claude Code and ask it to localize whatever you're adding (e.g. "localize src/apps/schema/src/app/components/NewThing.tsx"), or invoke the Workflow tool directly in the chat:
Workflow({
  name: "localize",
  args: { target: "src/apps/schema/src/app/components/NewThing.tsx" },
});
Args (target is the only required one):
target— a file path, folder path, or array of paths to localize. The workflow follows the transitive import graph from here, so pointing it at a new component is enough; you don't need to enumerate its children.namespace(optional) — the i18next namespace to target. If omitted, it's inferred fromtarget's location, grounded in what's already there (existingt()calls nearby, existingpublic/locales/en-US/<ns>.jsonfiles) rather than a naive folder-name guess — e.g.src/apps/content-editor/**correctly resolves tocontent, notcontentEditor.lazyLoadRoot(optional) — the sub-app entry point that owns the namespace's<Suspense>boundary, if the workflow can't auto-discover it.
What it does: enumerates the target + its transitive imports, extracts every hardcoded string (JSX text, string props, notify() calls, module-level maps, class components), reuses existing common/shell keys where the English text already matches one, wires the t()/i18n.t() calls in place, writes en-US/<ns>.json and seeds the other 5 locales with English placeholders, then runs tsc --noEmit, JSON validity, key-parity, and broken-key-reference checks.
What it returns: { namespace, filesWired, newKeys, reusedKeys, verifyPassed, verify, crossNamespaceGaps, inaccessibleThirdParty }.
crossNamespaceGaps— files pulled in transitively that live in a different namespace than the target: their strings are extracted into that namespace's JSON but left unwired, since wiring them under the wrong namespace would misattribute them. Each entry includes a ready-to-run follow-up, e.g.Workflow({ name: "localize", args: { namespace: "shell", target: "src/shell/store/ui.ts" } }).inaccessibleThirdParty— third-party components with hardcoded strings and no locale API; needs a manual call (wrap it, or accept it stays English).
See the "Localization (i18next)" section of CLAUDE.md for the conventions this workflow enforces (key naming, pluralization/CLDR rules, what to skip, value-formatting rules).
Connect to Zesty Material Design Systems
npm link @zesty-io/material
In Material codebase make your edits
npm run build => npm pack
A .tgz file will be created copy the file path and install to Manager-Ui
EX: npm i ~/Code/material/zesty-io-material-0.0.3.tgz
Shortcut to see edits without having to build material app again
Go into node_modules/@zesty-io/material/es/theme/index.js make a change and hot reload will show new edit locally.
ToggleButtonGroup
We are adding exclusive prop to only allow one of the child values to be selected.
OnChange value: of the selected buttons. When exclusive is true this is a single value; when false an array of selected values. If no value is selected and exclusive is true the value is null; when false an empty array.
In some case when sending null this will break the togglebutton UI, thus the reasoning for adding toggleHandlers that checks null through the codebase.
To upload assets for your projects put them on the CDN, do not put them in the repository. Assets can be uploaded at https://console.cloud.google.com/storage/browser/assets.zesty.io?project=zesty-prod , upload to the respective folder that match your project name, for example, the SVGs and PNG that are being commited to manager-ui should be moved into this storage bucket under the manager folder, once they are uploaded they accessible from https://assets.zesty.io e.g. https://assets.zesty.io/website/assets/images/dxp_bottom_bg.svg

For in-app deeplinks the preferred url structure is to use url path parameters as opposed to query parameters. Generally, paths are best used used to deep link into a specific view (a combination of UI layout and elements rendered on screen) whereas query parameters are used to refine a view.
Table view: /content/6-000-0000
Table view filtered to published items: /content/6-000-0000?status=published

Content edit view: /content/6-000-0000/7-000-0000
Content edit view that displays deactivated field: /content/6-000-0000/7-000-0000?showDeactivated=true

Comment in content edit view: /content/6-000-0000/7-000-0000/comment/12-000-0000/24-000-0000
Comment in content edit view that displays deleted replies: /content/6-000-0000/7-000-0000/comment/12-000-0000/24-000-0000?showDeleted=true
To keep our issue tracking process efficient and ensure clarity, please follow these guidelines when creating and logging GitHub tickets.
Issue Naming:
- Use the format:
[APP NAME] - [DESCRIPTION OF THE ISSUE] - Example:
Content - Laggy Horizontal Scrolling - See screenshot for examples on how to format the issue title

Clearly define the issue by supplying the following relevant information:
- A clear and concise description of the issue
- Screenshots and/or video recordings
- Reproduction steps
Moving forward, all bugs and enhancements impacting Manager UI and Accounts UI must be logged in the Product Roadmap Board. This applies whether you discovered an issue yourself or it is reported by a customer.
- Straightforward bug fixes: Add to the
Design Completecolumn. Make sure to sort the issues by priority, issues with higher priority goes on top of the list. - Complex bugs/enhancements/feature requests requiring input/design: Add to the
Being Designedcolumn.
See the attached screenshot for reference.

For anything requiring immediate attention, please notify the engineering team and the relevant stakeholders on Slack (#product), and they will address it as soon as possible.